Preparation:
1.1 Preparation of Gluing Template:
Choose a 0.5mm thick polytetrafluoroethylene gluing template from the range of 300mm-720mm according to the size of the paper window. Align one edge of the paper to be laminated with the side of the gluing template and draw the outline of the window along the template using a marker. Draw a 5mm-wide gluing position line along the window outline. Attach a 2mm thick double-sided adhesive tape to one side of the gluing rubber strip and stick it to the gluing position. Optionally, use adhesive paper to reinforce the bond between the rubber strip and the gluing template. Assemble the gluing template by inserting the hook-shaped bar at one end into the groove of the plate roller and sticking the other end with adhesive paper. The thickness of the assembled gluing template is approximately 10mm.
1.2 Installation of Cutting Blade:
Lift the cutting blade roller to the top, place the upper blade into the cutting blade roller groove, ensuring the lower end of the blade contacts the bottom of the groove. Tighten 18 M6×15 fixing screws in sequence from the middle to the sides. Install the lower blade by inserting it through the machine’s through-hole into the blade holder. Slightly tighten one screw in the middle and two screws at both ends using a wrench. Rotate the cutting blade roller manually and adjust the gap between the upper and lower blades to 0.03-0.05mm by loosening 19 M8×110 screws. Tighten 18 M10×95 screws to press the lower blade, and then tighten the M8 nut.
Both sides of each cutting blade can be used alternately. When the blade edge becomes dull, it should be sharpened on both surfaces for continued use. Generally, new blades are installed in the cutting blade roller, and the height of the lower blade can be adjusted using M8×110 screws to control the gap with the upper blade.
1.3 Preparation of Film and Glue:
The films used for window lamination are mostly made of polypropylene (PP) or polyethylene (PE), with a width approximately 15-20mm wider than the window. Load the pre-cut film rolls onto the rear rack of the main machine. The film length should be about 30mm longer than the window length. Different films should be paired with corresponding adhesives. Water-soluble white glue is commonly used, meeting environmental standards without toxic or ozone-depleting substances. The glue should adhere well to the film as a baseline for preparation.
Adjustment and Operation:
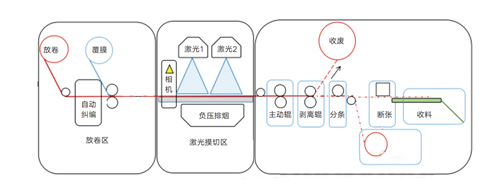
2.1 Paper Feeding:
Arrange the paper to be laminated on the inclined paper feeding table. The bottommost sheet is separated from the stack by the paper feeding belt during rotation. The paper is conveyed between the paper feeding belt and the pressure roller and enters the paper feeding device.
2.2 Paper Conveyance:
After entering the paper feeding device, the paper is pushed forward by the push paper stop on the chain, guided by the adjustable upper and lower guides, and delivered to the vacuum conveyor belt of the gluing device.
2.3 Adjustment of Gluing Device:
Adjustment of Glue Amount:
Loosen the two star-shaped handles and adjust the gap between the transfer roller and the glue roller by turning the small wall panels’ handles on both sides. Upward rotation reduces the glue amount, while downward rotation increases it. Once the appropriate glue amount is achieved, tighten the star-shaped handle screws.
Adjustment of Gap between Glue Rollers and Cutting Rollers:
Adjust the gap by moving the handles downward, and then rotate the top star-shaped handle screws of the small wall panel. The gap can be controlled by adjusting the 19 M8×110 screws. After achieving a gap of 0.03-0.05mm, tighten the 18 M10×95 screws to press the lower blade and then tighten the M8 nut.
Adjustment of Gap between Glue Rollers and Conveyor Belt:
Loosen the two handles on the outer side of the operating panel and the inner side of the transmission panel, respectively. Rotate the two spherical handles to move the gluing roller up and down, changing the gap between the gluing roller and the conveyor belt to accommodate different paper thicknesses. Then, tighten the two handles.
Adjustment of Gap between Cutting Blade and Conveyor Belt:
Rotate the adjustment screws on both sides of the operating panel and the transmission panel to move the cutting blade up and down, changing the gap between the cutting blade and the conveyor belt to avoid glue transfer when there is no paper.
Adjustment and Control of Paper Feeding Table Airflow:
Adjust the airflow using the ten adjustment screws on the paper feeding table. Clockwise rotation reduces or closes the suction airflow, while counterclockwise rotation increases it. One adjustment screw can be used to reduce or close the suction airflow.
Adjustment of Position of Cutting Blade and Gluing Roller:
Adjust the cutting blade and gluing roller positions by releasing the M8 fixing screws on the inner side of the cutting blade roller. Rotate the cutting blade roller to make the ink mark on the rubber strip align with the desired position for window lamination. After adjustment, tighten the M8 fixing screws.
2.4 Film Lamination:
Adjustment of Cutting Length:
Adjust the cutting length, generally 30mm longer than the window length, using the handwheel while the machine is in a stopped state.
Width Direction Installation and Adjustment of Film:
Install the film roll on the shaft, release the handle on the wall panel, thread the film through the lower blade, and tighten the handle. Adjust the film’s relative position on the shaft by loosening three M6 screws on both ends of the film roll. Ensure the film aligns with the paper window, and lock the M10 and fluted nuts. If the film is too wide, use the cutting blade to trim it to the required width.
Control and Adjustment of Airflow for Cutting and Laminating Rolls:
Adjust the airflow using the three handles on the airflow adjustment blocks for the cutting and laminating rolls.
Adjustment of Film and Paper Window Position:
Adjust the position of the film relative to the paper window using the adjustment knob on the rear wall panel. Align the paper and film correctly before resuming lamination.
2.5 Adjustment of Paper Output and Collection Position:
Adjustment of Paper Collection Belt:
Rotate the adjustment screw at the rear of the paper collection table to move the belt back and forth, ensuring proper tension.
Adjustment of Gap between Paper Collection Belt and Film Conveyor Roller:
Loosen the locking handle, rotate the adjustment knob clockwise, and maintain a gap equal to the thickness of one card between the paper collection belt and the film conveyor roller.
Adjustment of Position of Nylon Wheels:
Move the connecting plate along the axis to position the two nylon rollers on either side of the window lamination area.
Click to learn more about book printing, sticker printing, medicine box, hardcover book printing, PE bag, Religious book printing, shopping bag printing, catalog printing, and printing in China.
Adjustment of Paper Collection Table Height:
Rotate the adjustment screws at the rear of the wall panel to adjust the height and position of the paper collection table. Ensure proper alignment of the collected paper.
These steps provide a comprehensive guide for the correct operation of the film laminating machine.
Comments
No comments yet. Be the first to react!